10 tips to optimize your creations
🌐
Everyone who works with fashion knows that designing clothes is one of the creative steps that demand more energy and time.
In this sense, this is a fundamental part of the work of the stylist who wants to stand out in a market so competitive and so flashy, and to create incredible pieces with greater agility, it is worth taking some tips into account!
to help you develop creativity and dynamism in the conception and design of pieces, the Audaces blog has prepared a small guide with all the fundamental tips you need to know.
Follow the reading and find out what they are:
How to design clothes more quickly?
As in almost all human activities, practice leads to improvement and it can lead to perfection. So, our first tip is: draw, draw and draw a lot!
That’s what leads to the improvement of your technique of designing clothes, looking for references in fashion trends, inspirations and other looks from other artists, brands and projects. In addition, practice is also a great way to create your own identity.
In this way, with continuous work, you will earn more and more style and signature of their works.
It doesn’t matter if you are new to this field or have several years of experience. some of the tips below may help you in your daily work, check it out:
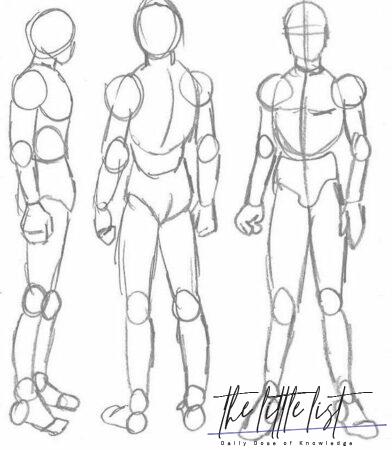
1. Start designing clothes for the human body:
First, start by learning and perfecting the design of the human body, as this is the basis for any costume or accessory creation. In this case, the important thing is that you absorb the understanding of body proportions, such as:
- From the knee to the bottom of the feet.
- From the top of the femur (located on the thigh) to the kneecap (knee).
- From elbow to fingertips.
- From the collarbone to just below the navel.
- From chest width to shoulder to shoulder.
Technical drawing – Sketch
Then, after you’ve practiced a lot with the model in a frontal position, you can develop the technique of many stylists of working the human body in more natural poses – already thinking as if the model was walking along the catwalk.
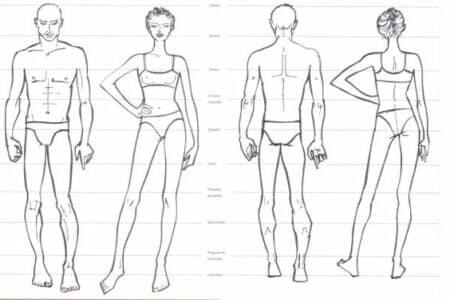
Example of technical drawing of the human body.
2. From sketch to final stroke – improve your sketches
Once you’ve mastered the proportions of the human body, it’s worth investing time in the first sketches of your creations. The tip here is to always start by releasing the imagination and creativity with freer strokes and pencil scribbles.
Once the idea is more consolidated, you can reinforce the most important lines with paint before moving on to coloring the clothes.
There are several techniques for creating sketches – from those that use pencil and paper to the most modern ones, which have dedicated software and programs. The important thing is to start from a point that is comfortable for you and, as progress emerges, test out new possibilities.
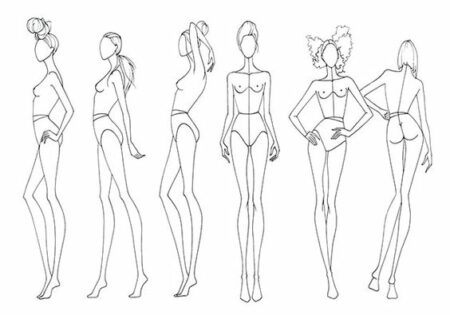
Advancement in the technique of lines, unifying the human body and created look.
3. The simplest step by step to design clothes:
Now, the first stroke you should make in your quest to practice drawing the human body will be done vertically. On a sheet of paper, scribble a straight line that will represent the center of gravity of your model.
Then at the top of this line make the head in an oval shape. Then, in the middle of the vertical line, scribble a square to represent the pelvic region of the silhouette. The larger this square, the larger the measurements of your model.
Still, imagine that if the body is not in a straight position but leaning to one side, this square should be drawn next to the center vertical line.
Finally, to finish the model’s silhouette, draw the torso with two lines facing up and with a straight line over them just below the head. With this base it is possible to start drawing the body beyond the initial base.
First traces in designing clothes and looks.
4. Develop your style:
Now that you’ve learned the basics about human figures, it’s time to practice proportions well and try out the first part designs.
Try to create for different types of silhouette and body, play with different style schools and cultural references. Anyway, draw a lot!
The more you draw, the easier it is to identify which types you draw better. It’s also worth studying other artists and trying out their style.
That way, after trying different ways to draw, you’ll be able to develop your own stroke and signature. But keep in mind that this is a process that can take some time, so be concerned at first with practice a lot.
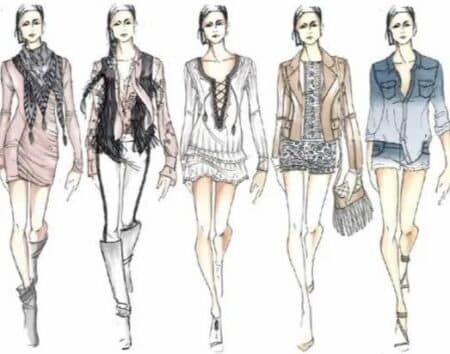
5. Front and back:
The next step, after the scribbled lines have been consolidated into a final design that “dresses” a person’s silhouette, it’s worth working on the presentation of the clothing itself.
At this point, it’s important that you design both the front and back of the dress, showing what the front and back would look like.
By doing this detailing, it is easier to present variations of clothing and details that may result in new costume options.
In addition, within the garments, the front and back design of the piece is essential for the next steps, especially the construction of the technical sheet and the molds that will be part of the pilot part, that is, the base model for the entire production.
6. Search and practice with tutorials:
One of the advantages of the internet is the diversity of information and content available on different websites and apps about fashion.
A good tip is to always look for new information and tutorials on the subject on sites like YouTube.
Some interesting channels to explore how to design clothes – even in a faster and/or more detailed way and with tips for different levels of learning/practice – are the Pen & Graphite, O Drawing & Paiting – The Virtual Instructor, Fashion Teaching, FSketcher, between others.
An interesting site with tutorials for different levels of professionals is the University of Fashion.
7. Alternative methods for designing amazing clothes:
The more you design clothes, the easier it is for you to do this. Consequently, you will make the proportion of the body faster and will be able, after this stage, to draw the sketches with the proper proportions without thinking twice about it.
This is the most recommended path!
But if you’ve already passed this stage and you quickly need a sketch to work as a basis for your creation and don’t have much time for that, there are some sites on the internet that offer varied and free options.
Some sketching options can be found in the University of Fashion, at the I Draw Fashion, at the Pinterest, at the fashion, between others.
However, these platforms are not only useful in emergency cases – they are also part of the technological resources that can facilitate and boost your clothing designs. So, refer to them whenever necessary or when looking for references!
8. Dive into references and trends
All creations, especially those related to the fashion universe, are based on a series of references and trends – old and current – that make up every stylist’s collection. Therefore, to create pieces or even entire collections, the first step to do this is to dive into different references and look for market trends.
To do this, look for trends and style references in different cultural producers (such as TV series, cinema, music, plastic arts, etc.) to unleash the imagination in your creations.
Another tip is follow the big fashion events, as they are the ones who dictate the trends that arrive here.
9. Define your collection profile:
As important as always looking for new references and trends to create collections and design interesting clothes is knowing exactly who you are creating your pieces for.
Before creating, it is necessary to know well (or imagine) the target audience, the tastes and purchase profile of this audience.
When you have this clear it will be possible to define not only the style of each piece, but also the fabric, colors and all the details that will differentiate that model from others aimed at other audience profiles.
10. Use technology as an ally:
Finally, once you’ve practiced drawing on paper, it’s worth studying the market’s proposals to design clothes with much more agility using technology.
Currently, there are options on the market for beginners and for professionals and companies that are looking to save time and optimize processes.
These professional tools are complete management and production software that adapt to your needs.
Now that you’re on top of these super tips for designing amazing looks, how about downloading this exclusive 4D drawing e-book? After all, the future is now, and it belongs to you!
Discover more articles in our categories Fashion & Looks & Luxe ou encore 90s Outfits.
Thanks for visiting we hope our article 10 tips to optimize your creations
, we invite you to share the article on Facebook, instagram and whatsapp with the hashtag ☑️ #tips #optimize #creations ☑️!
![60 wavy haircuts perfect for you [FOTOS LINDAS]](https://thelittlelist.net/wp-content/uploads/2021/11/60-wavy-haircuts-perfect-for-you-FOTOS-LINDAS-150x150.jpg)